EdFig.dev

Musings, DIY projects, Linux, IaC, and other things.

I've been at jury duty for weeks on a long running court case. in that time we're only allowed to take hand written notes on small legal pads that we can't take with us.

I've actually been enjoying the process and figuring out a good writing and reference system for myself.

I'll try to update this post with some examples later but I'm putting it up now so I can finish out Blaugust on a win.

| Eddie

Accidently nuked half of some resources and broke DNS (yes, it is in fact always DNS). One of the first things I learned and is on a lot of guides for terraform is how count works. It’s one of the meta-arguments you can use with most resources, others are

depends_on
count
for_each
provider / providers
lifecycle

Here’s an example for count before I show my oops.

variable "names" {
  default = ["alice", "bob", "carol"]
}

resource "aws_instance" "web" {
  count         = length(var.names)
  ami           = "ami-0c55b159cbfafe1f0"
  instance_type = "t3.micro"

  tags = {
    Name = var.names[count.index]
  }
}

Remove "bob"default = ["alice", "carol"]. You’ll see this in your terraform run of web[1] transitioning.

  ~ Name = "bob" -> "carol"

carol shifts from index 2 → 1, so Terraform modifies the bob instance to become carol, and destroys the old carol. Two changes instead of one.

count is very quick and easy to use but honestly I avoided it. If I read of a feature that has to be used with extra considerations, I’d rather use the pattern that doesn’t let me screw up if my coffee has fully kicked in.


In my case, I added to middle of an array in a variable but the implementation logic was a count instead of a for_each.

Here’s an implementation that guarentess uniqness in the array to avoid collisions and doesn’t care about order.

# Before (vulnerable — index shuffle on any list change)
resource "aws_instance" "web" {
  count         = length(var.names)
  ami           = "ami-0c55b159cbfafe1f0"
  instance_type = "t3.micro"

  tags = {
    Name = var.names[count.index]
  }
}

# After (safe — each instance is an independent resource)
resource "aws_instance" "web" {
  for_each      = toset(var.instances)
  ami           = "ami-0c55b159cbfafe1f0"
  instance_type = "t3.micro"

  tags = {
    Name = each.key
  }
}

Even better is that with the first method you access the resource like aws_instance.web[0] but with the 2nd you get a much more descriptive and assuring aws_instance.web["bob"]

| Eddie

Some Recs and Resources. It’s come up a few times so I made a page to quickly share with others.


Death House

Horror themed, prequel to Curse of Strahd, Death House is meant for 3rd to 5th level players. I’ve never ran this. Only tip I know is to not let anyone 1v1 the broom lol.

Review TBD :(


Study in Marble

From the DMSguild.com page for it. Also was announced via reddit and they have some tips and suggestions.

The richest man on the isle of Syklos has suddenly gone missing. He’s been known to have some extramarital excursions in the past, but this time is different—he hasn’t come back. Why did he disappear? Who is responsible? And what does the eccentric local sculptor have to do with it? A Study in Marble is an adventure for a 3rd to 5th level party inspired by ancient Greek mythology. Players will unravel a mystery in an urban environment, with significant emphasis on social interaction and gathering clues; the module can be played as a one-shot or integrated into an existing campaign as a side quest. The adventure is especially suitable for campaigns set in the world of Theros, but can fit into any campaign with room for a Greek city.

This module includes: – 3 maps, in both PDF and JPG format – 4 possible endings, depending on the choices made by the party – 1 central plot twist that will keep your players guessing

Review:

Roleplay heavy, fun to run.


A Wild Sheep Chase

A Single-Session Adventure for parties of 4th-5th level The very first adventure produced by Winghorn Press, freshly updated with player feedback and suggestions, as well as a brand new map. When the party’s attempt to grab a rare afternoon of downtime is interrupted by a frantic sheep equipped with a Scroll of Speak to Animals, they’re dragged into a magical grudge match that will test their strength, courage and willingness to endure baa’d puns.

Will our heroes be able to overcome a band of transmuted assassins and an extremely bitter apprentice packing dangerously unstable magic items? There’s only one way to find out.

Free download here from their site

Review:

Can either be roleplay or combat driven. Good for new players or new DMs. I’ve got some mini’s for this one if you’d like to use them.

| Eddie

Transferring

I’m going to SCaLEx23. I don’t tend to use my laptop as a primary device so I was transferring everything.

I literally can’t live without my aliases and shortcuts so in my rush I somehow moved a copy of my .bashrc into ~/.bashrc.d. Which doesn’t sound like a big deal except I have this in my main file.

if [ -d ~/.bashrc.d ]; then
for rc in ~/.bashrc.d/*.sh; do
  if [ -f "$rc" ]; then
    . "$rc"
  fi
done
fi

Why load everything in? Because I’m lazy.

I find out on next login that I’m stuck in a login-loop. Getting in through TTY3 check the thousands of SDDM error crashing messages in journalctl and remove the rogue file.

The Fix

I’ve since moved everything to only loop over items ending in .sh to avoid this unwanted files being sourced.

| Eddie

I like the fun linux commands that rice out your setup but I don’t like having to remember when/how to use them.

I’ve got my .bashrc that calls everything in .bashrc.d/*. In there I’ve started throwing in files with custom config options.

Here’s a quick ls function that’s context aware. I’ll be expanding it as I learn better ways to use eza or similar listing tools.

alias ls='_ls'
# ls: use eza with git info inside git repos, plain ls elsewhere
_ls() {
    if git rev-parse --is-inside-work-tree &>/dev/null; then
        eza -l -h --git --git-repos --total-size --no-user --git-ignore --icons "$@"
    else
        command ls "$@"
    fi
}

Turns this

figsystems on main
  11:48 ❯ /usr/bin/ls
archetypes  content  hugo.yaml  README.md  themes

to this

figsystems on main
  11:48 ❯ ls
Permissions Size Date Modified Git Git Repo Name
drwxr-xr-x@ 1.1k  5 Feb 14:18   -- - -       archetypes
drwxr-xr-x@  70k  5 Feb 14:18   -- - -       content
.rw-r--r--@ 3.4k  5 Feb 15:57   -- - -       hugo.yaml
.rw-r--r--@  237  5 Feb 14:18   -- - -      󰂺 README.md
drwxr-xr-x@    0  5 Feb 14:18   -- - -       themes

| Eddie

The Problem

At work we’re in the middle of a large lift and shift migration from VMware to AWS (for the same reason everyone is). Hundreds of servers across multiple departments, moved in waves.

The firewall rules for these servers come from everywhere. Palo Alto firewalls, host-based firewalls, department-specific switches, department-specific IT teams, random appliances that predate much of the current staff. Years of accumulated rules from multiple sources, and now they all need to become AWS security groups.

I needed to figure out how to format these rules in Terraform so that: – Coworkers completely new to IaC could read them – I could maintain them without losing my mind as rule counts climbed – PRs were reviewable

This is how the format evolved over three iterations.

Iteration 1: Inline Rules

The most straightforward way to write a security group. Everything in one block.

resource "aws_security_group" "web_server" {
  name        = "web-server"
  description = "SG for web-server"
  vpc_id      = var.vpc_id

  ingress {
    description = "HTTPS from campus"
    from_port   = 443
    to_port     = 443
    protocol    = "tcp"
    cidr_blocks = ["10.0.0.0/24"]
  }

  ingress {
    description = "SSH from admin subnet"
    from_port   = 22
    to_port     = 22
    protocol    = "tcp"
    cidr_blocks = ["10.100.0.0/24"]
  }

  egress {
    description = "Allow all outbound"
    from_port   = 0
    to_port     = 0
    protocol    = "-1"
    cidr_blocks = ["0.0.0.0/0"]
  }
}

This works fine for a server with 3-4 rules and is the first example you usually come across if you search for “ec2 firewalls”. It’s easy to read and easy to explain to someone who’s never seen Terraform before.

The problem is that any change to any inline rule forces Terraform to evaluate the entire security group. Add a CIDR to one ingress block and the plan output gets noisy. It also doesn’t play well with for_each if you want to loop over CIDRs for a single port.

Iteration 2: Separate Rule Resources

Breaking the rules out into their own resources using aws_vpc_security_group_ingress_rule and aws_vpc_security_group_egress_rule.

resource "aws_security_group" "web_server" {
  description = "SG for web-server"
  vpc_id      = var.vpc_id

  tags = {
    Name   = "web-server"
    Source = "Palo Alto Firewall"
  }
}

# Egress
resource "aws_vpc_security_group_egress_rule" "web_server_allow_all_outbound" {
  security_group_id = aws_security_group.web_server.id
  ip_protocol       = "-1"
  cidr_ipv4         = "0.0.0.0/0"

  tags = {
    Name = "allow-all-outbound"
  }
}

# HTTPS from campus
resource "aws_vpc_security_group_ingress_rule" "web_server_https_443" {
  for_each          = var.https_443_cidrs
  security_group_id = aws_security_group.web_server.id
  cidr_ipv4         = each.key
  description       = each.value
  ip_protocol       = "tcp"
  from_port         = 443
  to_port           = 443

  tags = {
    Name = "HTTPS-443-${replace(each.key, "/", "-")}"
    Rule = "tcp-443"
  }
}

# SSH from admin subnet
resource "aws_vpc_security_group_ingress_rule" "web_server_ssh_22" {
  for_each          = var.ssh_22_cidrs
  security_group_id = aws_security_group.web_server.id
  cidr_ipv4         = each.key
  description       = each.value
  ip_protocol       = "tcp"
  from_port         = 22
  to_port           = 22

  tags = {
    Name = "SSH-22-${replace(each.key, "/", "-")}"
    Rule = "tcp-22"
  }
}

With variables like:

variable "https_443_cidrs" {
  type = map(string)
  default = {
    "10.0.0.0/24"   = "Campus network"
    "10.100.0.0/24" = "Admin subnet"
  }
}

variable "ssh_22_cidrs" {
  type = map(string)
  default = {
    "10.100.0.0/24" = "Admin subnet"
  }
}

This is better. Each rule is its own resource so Terraform plans are cleaner. Adding a CIDR to a port only shows that one rule changing. The for_each on a map of CIDR-to-description means you can see at a glance what each IP range is for.

I used this format for the 2nd wave. It worked. But by the next few waves we were moving more servers per wave and each server had its own set of variables. The variable files were getting long and hard to cross-reference with the rules.

Everything was also moved into a $WORKSPACE/modules/security-groups/ directory to keep it organized. One file per server’s rules, one file per server’s variables.

Iteration 3: Locals with Structured Data

By the time we were moving double digit servers per wave, the variable-per-port approach was getting hard to maintain. Too many variable files, too much scrolling back and forth to understand what a server’s rules actually looked like.

I switched to using locals with a structured list. All the rules for a server live in one block. Each entry defines the port, protocol, and every CIDR that needs access on that port.

locals {
  web_server_ports = [
    # HTTPS
    {
      protocol = "tcp"
      from     = 443
      to       = 443
      name     = "https-443"
      cidrs = {
        "10.0.0.0/24"   = "Campus network"
        "10.100.0.0/24" = "Admin subnet"
      }
    },
    # SSH
    {
      protocol = "tcp"
      from     = 22
      to       = 22
      name     = "ssh-22"
      cidrs = {
        "10.100.0.0/24" = "Admin subnet"
      }
    },
    # RDP
    {
      protocol = "tcp"
      from     = 3389
      to       = 3389
      name     = "rdp-3389"
      cidrs = {
        "10.100.0.0/24" = "Admin subnet"
      }
    },
    # HTTP
    {
      protocol = "tcp"
      from     = 80
      to       = 80
      name     = "http-80"
      cidrs = {
        "10.0.0.0/24" = "Campus network"
      }
    },
  ]

  # Flatten into individual rules
  web_server_rules = flatten([
    for port_config in local.web_server_ports : [
      for cidr, description in port_config.cidrs : {
        key         = "${port_config.name}-${replace(cidr, "/", "-")}"
        protocol    = port_config.protocol
        from_port   = port_config.from
        to_port     = port_config.to
        cidr        = cidr
        description = description
        rule_name   = port_config.name
      }
    ]
  ])

  # How many rules total
  web_server_total_rule_count = length(local.web_server_rules)

  # How many SGs needed (AWS has a rules-per-SG limit)
  web_server_sg_count = max(1, ceil(local.web_server_total_rule_count / var.max_rules_per_sg))

  # Chunk rules across SGs
  web_server_rules_chunked = {
    for sg_index in range(local.web_server_sg_count) : sg_index => [
      for rule_index in range(
        sg_index * var.max_rules_per_sg,
        min((sg_index + 1) * var.max_rules_per_sg, local.web_server_total_rule_count)
      ) : local.web_server_rules[rule_index]
    ]
  }
}

The security group itself handles overflow automatically. If a server has more rules than AWS allows per SG, it creates additional SGs and distributes the rules across them. Neither I nor anyone in my team had to count rules to make sure they were split across security groups evenly. It all gets generated dynamically.

# Primary SG
resource "aws_security_group" "web_server" {
  name        = "web-server"
  description = "SG for web-server"
  vpc_id      = var.vpc_id

  lifecycle {
    create_before_destroy = true
  }

  tags = {
    Name = "web-server"
  }
}

# Overflow SGs (created only if needed)
resource "aws_security_group" "web_server_overflow" {
  for_each = { for idx in range(1, local.web_server_sg_count) : idx => idx }

  name        = "web-server-overflow-${each.value}"
  description = "SG for web-server (Overflow ${each.value})"
  vpc_id      = var.vpc_id

  lifecycle {
    create_before_destroy = true
  }

  tags = {
    Name = "web-server-overflow-${each.value}"
  }
}

# Egress (primary SG only)
resource "aws_vpc_security_group_egress_rule" "web_server_allow_all_outbound" {
  security_group_id = aws_security_group.web_server.id
  ip_protocol       = "-1"
  cidr_ipv4         = "0.0.0.0/0"

  tags = {
    Name = "allow-all-outbound"
  }
}

# Ingress for primary SG
resource "aws_vpc_security_group_ingress_rule" "web_server_ingress" {
  for_each = {
    for rule in local.web_server_rules_chunked[0] :
    rule.key => rule
  }

  security_group_id = aws_security_group.web_server.id
  cidr_ipv4         = each.value.cidr
  description       = each.value.description
  ip_protocol       = each.value.protocol
  from_port         = each.value.protocol == "-1" ? null : each.value.from_port
  to_port           = each.value.protocol == "-1" ? null : each.value.to_port

  tags = {
    Name = each.value.key
    Rule = each.value.rule_name
  }
}

# Ingress for overflow SGs
resource "aws_vpc_security_group_ingress_rule" "web_server_overflow_ingress" {
  for_each = merge([
    for sg_index, sg in aws_security_group.web_server_overflow : {
      for rule in local.web_server_rules_chunked[sg_index] :
      "${sg_index}-${rule.key}" => {
        sg_id       = sg.id
        cidr        = rule.cidr
        description = rule.description
        protocol    = rule.protocol
        from_port   = rule.from_port
        to_port     = rule.to_port
        key         = rule.key
        rule_name   = rule.rule_name
      }
    }
  ]...)

  security_group_id = each.value.sg_id
  cidr_ipv4         = each.value.cidr
  description       = each.value.description
  ip_protocol       = each.value.protocol
  from_port         = each.value.protocol == "-1" ? null : each.value.from_port
  to_port           = each.value.protocol == "-1" ? null : each.value.to_port

  tags = {
    Name = each.value.key
    Rule = each.value.rule_name
  }
}

Adding a new server means copying the template, doing a find-and-replace on the server name, and filling in the ports list. The SG resource, egress, overflow, and ingress logic are all identical across servers. The only thing that changes is the data in locals.

The big win for PR reviews is that the ports local reads like a table. You can look at it and immediately see what ports are open and to whom without having to mentally reconstruct it from scattered variable files.

Standard Security Groups

While all the above handles per-server rules, we noticed early on that a lot of rules were the same across every server. RDP from the admin subnet, SSH from the admin subnet, ICMP from campus, etc. Every single server had these and we were duplicating them everywhere.

So we created a separate shared module: $ROOT_OF_MONOREPO/modules/standard-securitygroups. It only takes a vpc_id as input and creates a set of reusable security groups that any server can reference.

It does stuff like create our 3 admin groups: – default_admin — ICMP and monitoring/backup access. No remote access. – linux_admin – SSH mostly – windows_admin – All the lovely SCCM/WSUS/SMB cruft from admin networks.

The key difference from per-server groups is that it uses managed prefix lists to centralize the IP ranges. Instead of hardcoding CIDRs in every rule, the rules reference a prefix list.

resource "aws_ec2_managed_prefix_list" "linux_admin_access" {
  name           = "server-admin-access"
  address_family = "IPv4"
  max_entries    = 5

  entry {
    cidr        = "10.0.0.0/24"
    description = "Dept A linux Admin"
  }

  entry {
    cidr        = "10.100.0.0/24"
    description = "Dept B linux Admin"
  }
}

Then the rules reference the prefix list instead of individual CIDRs:

resource "aws_vpc_security_group_ingress_rule" "linux_admin_ssh" {
  security_group_id = aws_security_group.linux_admin.id
  prefix_list_id    = aws_ec2_managed_prefix_list.server_admin_access.id
  ip_protocol       = "tcp"
  from_port         = 22
  to_port           = 22

  tags = {
    Name = "SSH-22-admin-access"
  }
}

When a new admin subnet needs access, you add one entry to the prefix list and every security group that references it picks it up. No touching individual server rules.

A server ends up with its per-server SG for application-specific rules and one or more standard SGs for the common stuff:

vpc_security_group_ids = [
  module.security_groups.web_server_sg_id,
  module.standard_securitygroups.windows_admin_security_group_id
]

This keeps the per-server rule files focused on what’s actually unique to that server.

What’s Next

The standard module handles the baseline admin access that every server gets. The next step is creating standard service-level and department-service-level SGs.

A generic db-sg would cover common database ports that most database servers need. But a math-db-sg would layer on department-specific rules for the math department’s network ranges, their specific application servers, and their particular inter-database communication patterns. Same idea for web servers, app servers, etc.

The goal is to get to a point where standing up a new server means picking from a menu of standard SGs rather than writing rules from scratch every time.

What I’d Do Differently

Not much honestly. The progression made sense given the constraints. We didn’t know how many servers we’d be moving per wave at the start and the format evolved as the workload scaled. The template approach with find-and-replace is simple enough that even the folks brand new to Terraform are following along.

| Eddie
Issue

Royal Road likes to annoy pirates. This is (arguably) good.

Royal Road doesn’t care if they annoy RSS users. This is bad.

Here’s a walkthrough of the problem and the fix.

The Problem:

First, let’s look at the full picture of why this is happening.

The Original Website HTML (Simplified)

When you visit the Royal Road chapter in your browser, the full page’s HTML looks something like this. Your browser loads thesection and the section.


<html>
<head>
    <style>
        .cjZhYjNmYjZkZmFjZTQ2YTk4OWQwYjRiMjRjZDQyOGRl {
            display: none;
        }
    </style>
</head>

...

<body>
    <div class="chapter-content">

        <p class="cnMxYzY0ZjllNmVj...">
            <span style="font-weight: 400">Nathan got the message...</span>
        </p>

        <p class="cnNiYTMwZmE4YjE2..."> </p>

        <p class="cnNiOWQ0MDU1MDA2...">
            <span style="font-weight: 400">Sarya waved her hand...</span>
        </p>

        <p class="cnM0NjAwNWU4Y2Vl..."> </p>

        <span class="cjZhYjNmYjZkZmFjZTQ2YTk4OWQwYjRiMjRjZDQyOGRl">
            <br>The narrative has been stolen; if detected on Amazon, report...<br>
        </span>

    </div>

    </body>
 </html>

On the live website, your browser reads the <style> tag in the <head> and knows to hide the spam <span>. You never see it.

What FreshRSS Sees (The Problem)

I’ve told FreshRSS to only grab the content from .chapter-content which is the actual content of a post. So, FreshRSS requests the page and then scrapes only this part:


<p class="cnMxYzY0ZjllNmVj...">
    <span style="font-weight: 400">Nathan got the message...</span>
</p>

<p class="cnNiYTMwZmE4YjE2..."> </p>

<p class="cnNiOWQ0MDU1MDA2...">
    <span style="font-weight: 400">Sarya waved her hand...</span>
</p>

<p class="cnM0NjAwNWU4Y2Vl..."> </p>

<span class="cjZhYjNmYjZkZmFjZTQ2YTk4OWQwYjRiMjRjZDQyOGRl">
    <br>The narrative has been stolen; if detected on Amazon, report...<br>
</span>

Since FreshRSS never saw the <head> or the <style> tag, it has no idea it’s supposed to hide the spam <span>. It just displays all the text it found, resulting in this output in your feed reader:

Nathan got the message...

Sarya waved her hand...

The narrative has been stolen; if detected on Amazon, report...

This is the core of the issue: the content is hidden by a CSS rule that FreshRSS isn’t loading, and the class names are random, so you can’t just block the class.

The Fix: CSS Selectors

You need to tell FreshRSS how to remove the unwanted elements based on their structure, not their random class names.

Go to: Advanced –> CSS selector of the elements to remove. Paste this in the box:

.chapter-content > span

This selector targets any <span> element that is a direct child (using >) of .chapter-content.

The spam text <span class="cjZhY...">...</span> matches this rule.

The actual story text <span style="font-weight: 400">...</span> is safe because it’s a “grandchild” (it’s inside a <p> tag), not a direct child.

| Eddie

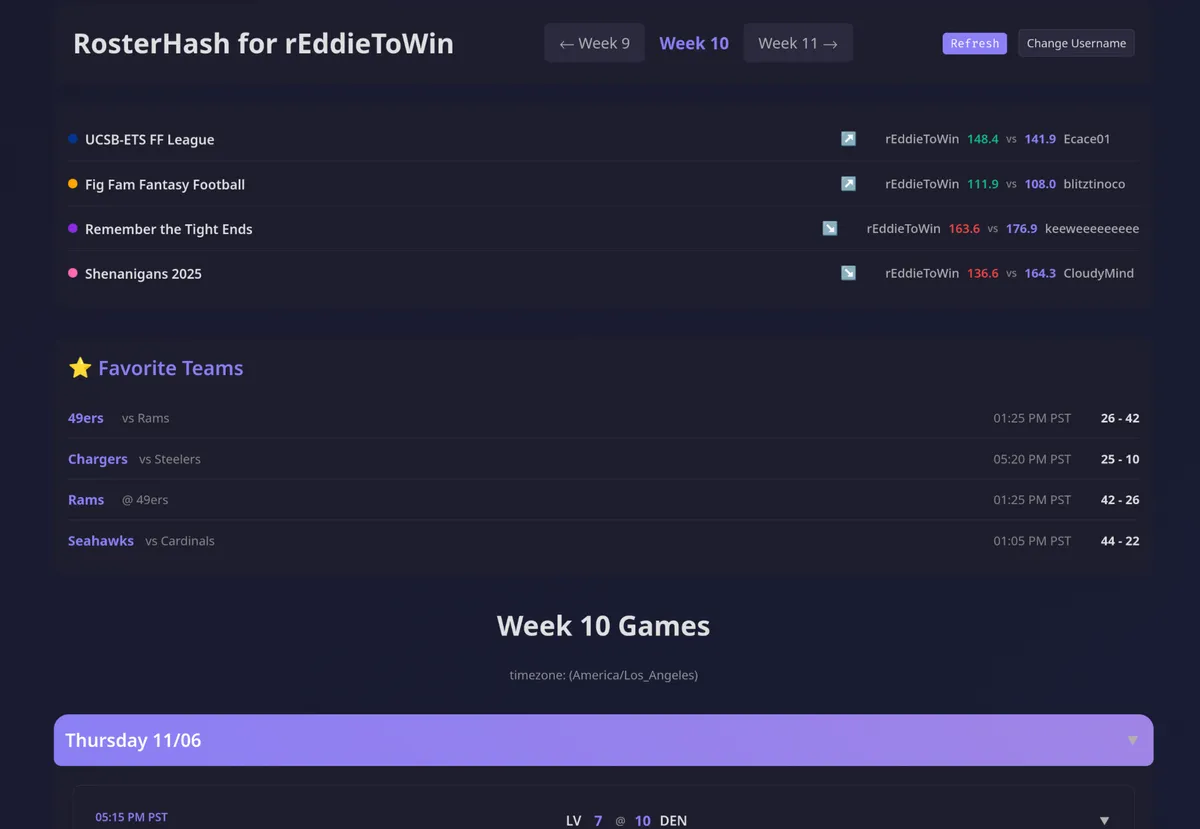
I joined another league this year.

I was losing track of who played when and what league.

So I made GameTime (nope, that’s taken) RosterHash!

Screenshot_20251120_150110

Enter your Sleeper username and away you go.

Features: – Can save up to 4 favorite teams for checking when they play and the score – Shows your players per league per game and color codes it all. – Completed games auto-collapse and get out of the way

| Eddie

What is this?

Let’s say you wanted to buy a domain like edfig.dev. You can host a personal blog at this address. Once you buy the domain, not only can you host content, but with a bit more tinkering you can send and receive emails with it.

You can email eddie@edfig.dev or admin@edfig.dev and that email will make its way to my inbox. You can set up rules to handle specific addresses too.

You’ll need to create accounts for the following: – Mailgun.com – porkbun.com

Setting it up

1. The Domain

You can buy a domain from any registrar, I recommend PorkBun or Cloudflare. I’ll be using Porkbun for this discussion.

Pricing will depend on the name and what TLD (the .com part). I occasionally run into issues with sites not recognizing eddie@fig.systems as a valid email address because it’s a lesser known domain.

Once you have it you can enter DNS records to where you host stuff or start using it for email.

2. The Email

Email is one of those things you shouldn’t host yourself, it’s very annoying. But luckily there are services out there that take care of most of the hassle. MailGun and SendGrid are two such services. I’ll be using Mailgun here.

With Mailgun I can: – Receive emails at custom email addresses with my domain – Route those emails based on rules – e.g. Emails sent to no-reply@edfig.dev are completely dropped – Send emails AS those email addresses through gmail – Receive an email at admin@edfig.dev at my regular gmail account and reply as admin@fig.systems – Use their API to programmatically send emails – Use their SMTP servers to send as custom email addresses – My self hosted services send notification emails as no-reply@fig.systems or as service_name@fig.systems

3. Setting up DNS

  • Buy a domain at porkbun.

Pick your favorite. I’ll be using figgy.foo for this, there was a good deal on it. – Log into Mailgun – Go to Send –> Sending –> Domains – Click on “Add New Domain” – Add figgy.foo, leave the rest blank, click Add Domain – Add DNS records to porkbun.

You’ll be provided with records for sending, receiving, and tracking.

In Porkbun Domain Management select DNS when you hover over your new domain.

Copy the entries over. Make sure the Types match and that you leave off the figgy.foo portion in the host field in porkbun. Anything you add in the host field will automatically append your domain to the end of it. If the field is just figgy.foo then leave the host field blank.

Copy all the Value fields from Mailgun to the Answer field in Porkbun and then click on Verify at the top right. You should see the status change to Active.

This is what your records in porkbun should look like.

porkbun-email-dns-records

4. Setting up Mailgun

Routing emails.

Go to Send –> Receiving and Create a Route. -

Expression Type –> Match Recipient – Enter admin@figgy.foo -

Enable Forward and fill in your personal address. For me that’d be my normal gmail address. -

Set priority to 50 so you have space to add future routes before or after this route. -

Add a simple description like “send to gmail” and Create the Route.

At the free tier you can only have 5 routes total. I only use the following: – Match no-reply@figgy.foo, Store and Notify and Stop processing. – Match family@figgy.foo, forward that email to multiple family members. – Useful for events and family plans. – Match Kindle@figgy.foo, forward to my custom Amazon provided kindle email address for sending epubs/pdfs. – much friendlier address than what they make for you. – A catch all final route that just forwards to my personal address.

Number 4 is where most of the magic and utility of setting all this up happens. I can give out unlimited custom email addresses and I’ll know who sent them by the address. That is, if I give out businessName@fig.systems I can later use that in gmail to filter, block, or search for anything related to that business. I can even see who sold my info if I start getting spam from that address.

| Eddie

RSS – Still Very Useful

I like having a centralized curated list of content. I’d rather go to a single page to catch up on new content instead of visiting or remembering to visit a bunch of different sites. I also don’t like having to deal with cookies and sites tracking my every move.

I use: FreshRSS, RSSHub, and RSSHub-Radar

I used to only use RSS for blogs and other text based content but with the above tools I can RSS-ify most anything.

The Flow of Content

FreshRSS is the rss aggregator and can be used as the reader either on desktop or as a PWA on mobile. I host my own at feeds.fig.systems. It’s got a few slick themes and has options to scrape webpages with x-paths. You provide a URL and use elements to select what you’d like to create your feed from, that’s a lot of work per feed.

That was my first go at RSS-ifying everything until I learned about RSSHub which does the same thing but handles it automatically. I host my own instance at RSSHub.fig.systems. They provide pre-made “routes” which make turning many common content sources into feeds.

For example I could add the feed rsshub.fig.systems/youtube/user/linustechtips/ to feeds.fig.systems and I’d get a new entry every time that channel uploads a new video.

Having to look up the routes can be annoying. Enter RSSHub-Radar, a nice browser extension that can automatically detect and provide the route for a given page you’d like to rss-ify. The extension can also be configured to format the url for whatever rss aggregator you use, FreshRSS or otherwise.

It’s worth going over RSSHub’s routes to get an idea of what can be turned into an rss feed.

| Eddie